Friday, August 29, 2014

Andrea's Savvy Challenge: Feathered Friends!

I am so pleased to be a guest designer again for Andrea's Savvy Challenge - this time around, we're featuring Feathered Friends on our creations! Any products at all are welcome :)


Supplies: peacock clip art from Graphics Fairy; Lace from Webster's Pages; Wilton doily; MME paper; Broken China distress ink; Tumbled Glass distress stickles; Basic Grey button; seam binding from stash


I distressed the edge of the peacock panel & then sponged it with distress ink. I also distressed the patterned paper - and sanded a bit on the pattern as well. The lace is stitched along the side, and the bow is stitched to the button as well. They aren't going anywhere ;)

I hope to see you play along with the Savvy Challenge - I'm away so will update you with the details of the challenge deadline when I get back - until then, check out Andrea's blog for all the info you need to play along!

ETA: We're home! This edition of the challenge will run until next Thursday, September 4, and make sure to link up here.
xoxo,
Jessi

Wednesday, August 27, 2014

Season's Greetings Wreath

OK, one more quick Christmas share before we're off to Grammie's! This one is for Merry Monday's  put a wreath on it challenge. 


Supplies: Basic Grey paper & brad; Martha Stewart branch punch; Peeled Paint distress ink; Stampendous sentiment; pearls from stash


I remember making a card with the same type of design last year, but darned if I can find the picture. Love making the little door :)


xoxo,
Jessi

Winter Wishes

A quick fly-by before the current jingle belles challenge ends!


Supplies: Prima North Country paper; Stampendous sentiment; Memento Gray Flannel ink; MME snowflake stamps; Picket Fence distress stickles; Sakura Stardust glitter pen; Corner Chomper

A true quickie since we're off to Grammie's house for a couple of days!
xoxo,
Jessi

Tuesday, August 26, 2014

Shopping our Stash #166 - ABCs


This week at Shopping our Stash, we're celebrating the start of school with a return to ABCs - we want you to use something that starts with each of those letters! Here are some ideas:

A: ant, anchor, arrow, apple, arithmetic, animal
B: bee, button, bow, bonnet, ball, brad
C: candy, carrot, car, corn, curtain, cow, comet, chipboard, chalkboard

Of course you aren't limited to those ideas, but you DO have to tell us what you've used!

I had a particular stamp set in mind that I wanted to use, but do you think I could find it? NOPE. So then I was stuck. Finally I went ahead to work on something else, and found this paper pad, and it all came together. *whew*


Supplies: Papers from Simple Stories; Buttons from Basic Grey; sentiment from Paper Smooches; Memento Tuxedo Black ink


Simple and straightforward! I let the paper do the heavy lifting. I've gone with 
A- apples, alphabet
B- buttons, black
C - chalkboard

Check out the design team creations & join us before next Monday, September 1st!

Tuesday Morning Sketches #264 - Zap Pow!

Good morning! I am so excited about my Tuesday Morning Sketches card this week - first of all, it has an adorable digi from our sponsor, Zap Pow Designs (LOVE them!) - and second of all, the layout is absolutely perfect!


Supplies: You Octopi Our Heart digi from Zap Pow Designs; Spectrum Noir markers; Dress it Up button; Shaded Lilac & Broken China distress inks; stencil from walmart; Mod Podge Dimensional Magic; Corner Chomper; ribbon from stash 


Of course the octopus has glossy glasses!
The stencil I used is about 3x4 inches, so I moved it around several times & overlapped it to get a more "bubbly" look. I love how it turned out!

Here's the sketch (I rotated it):

This sketch is open until next Sunday, August 31st  hop on over & see what the design team has created for you!


Bonnie (off for August)
Kris 

xoxo,
Jessi

Monday, August 25, 2014

Ombre Congrats

A few weeks ago during the Unique Blog Hop I shared a background I created inspired by my nails - well, I finally decided what to do with the piece I had left over :)


Supplies: Dylusions Grape mist; Mr. Huey's white mist; Paper Smooches sentiment; Spellbinders butterfly die; Studio Calico wooden heart; Cuttlebug embossing folder; Versamark; Stampendous Moonstone embossing powder; scrap of Shrinky Dink plastic; purple pearls from stash


Hard to get a good picture of clear elements, isn't it! Once I'd adhered the piece to the cardfront, one of the corners refused to lay flat. I decided to make that an "I meant to do that" element and curled up all four corners, and placed a pearl on the card base in each corner. 

Here's the photo of my nails that inspired the background (and no, they don't look like that now...lol)


This card is perfect for the current Keep It Simple! challenge of Ombre - first time I've played along there in a while :)

xoxo,
Jessi

Savvy Strawberries & Stitching!

A triple threat challenge from me this morning - I've combined the inspiration photo of strawberries from Andrea's Savvy challenge, the sewing challenge at ALBC, and the Last Days of Summer challenge at Open-Minded Crafting Fun. 


Supplies: Sentiment from PTI; Mowed Lawn distress ink; Sew Easy; paper unknown

I took this strawberry paper out when Andrea first posted the challenge, and here it is the end of the month before I could decide what to do with it! Better late than never. I am definitely loving my Sew Easy lately - I'm  a little addicted to one of the patterns, and forced myself to try a new one here. 

Here's the strawberry photo from Andrea in case you have a card up your sleeve before the deadline tomorrow:
strawberry field from Flickr via Wylio

xoxo,
Jessi

Saturday, August 23, 2014

Sisterhood of Snarky Stampers - K is for -


I think kraft is one of those colours that you don't really appreciate until you start playing with it. I doubt anyone thinks to themselves "Self, kraft is like theeee best colour, I love it!" (ok, maybe just me) but think about it - you could make a card for anything with kraft, and it would be appropriate. You can dress it up, dress it down...it's like the little black dress of crafting. So the Snarky Sisters want YOU to use some kraft! 

I've got two cards for you - I was DETERMINED to make a snarky card this time around, dammit, and then I forgot & made a cute card. I went back & snarked, and I feel much better now :)


Supplies: Stella - F*@k-up Fairy digi from Bugaboo Stamps; Spectrum Noir markers; Stardust Sakura glitter pen; Sew Easy


Who better than Stella to bring the snark? 
I used a bit of glitter pen on her wings, and outlined her with the lightest pink marker I have to help her pop (not because I went outside the lines a little and was trying to fix it. Nope.)

I'm popping my Stella card in over at Naughty or Nice challenges - and I think I'll be making a few more of these cards, because I can think of a number of people who have the F*#k up fairy visiting lately :)

And here's my not-snarky card:


Supplies: patterned kraft from stash; sentiment stamps from Paper Smooches; Brushed Corduroy distress ink; gem from stash; Wilton doily; clip art & sentiment from Crafty Secrets

I used a scrap from the edge of the patterned paper for the sentiment - I'm running low on kraft and have a few different colours of it. Easy matching! I also went nuts distressing & rolling the edges of the patterned piece & the photo. 


You've got 2 weeks to link up (by September 5th) - and stop by & say hello to my sistahs:


Barb (off this round)
Lynne (off this round)

And we are super pleased to have HAZEL with us this week as our guest designer! She got her Stella on too :) 

*if you're interested, I posted some updated tattoo pics earlier - here*
xoxo,
Jessi

Black, Gold, and Silver!

*if you're interested, I posted some updated tattoo pics earlier - here*

A quick & easy card for this week's Merry Monday colour challenge. 


Supplies: black shimmer paper from Colorbok; tree stamps from MME; sentiment from Stampendous; Versamark; Pirate Gold & Moonstone EP from Stampendous


shiny!


xoxo,
Jessi

Watercolours & Embossing

Last week I found myself sewing buttons on nearly every card I made - this week my embossing tool got the workout. I challenged myself to play a little more with watercolours - in my case, using glimmer mists - and I used a familiar layout with a favourite stamp set to do that.


Supplies: stamps from Flourishes; Versamark; Black Detail EP; Tattered Angels glimmer mists - Turquoise Blue and Key Lime Pie; green rhinestones from Dollarama


Using the glimmer mists as watercolours is fabulous - not only are they sparkly, and they blend beautifully, but they are already the right consistency for painting. No errors of too much/too little water! After the panel dried, I trimmed it down to card size & adhered it directly to the base, and added a few gems. Ta-da! 

Entering this card in two challenges -
Creative Card Crew - Embossing (wet or dry)
little red wagon - Confetti

xoxo,
Jessi

Card Blitz!

I have had a great crafty week! The temperature is cooler, the kids are mellow, and I was able to sit down & make all sorts of fun stuff. We are off on an overnight trip & of course last-minute-Lucy that I am challenges are ending before we get back, so here come a bunch of posts. Oh! And before I forget, some photos of the latest update to my tattoo - not the best quality, being car selfies of the back of my own arm, but you can get the idea at least :)
The newest part is the colour for the large lily & rose. The lyric around the rose reads "With every mistake...we must surely be learning," which is from "While My Guitar Gently Weeps."


So let's see...first up I'll share a journal that I made with the Naughty or Nice challenge & The Stamping Chef challenge in mind: 


Supplies: So. Many. Demented Beauty digi stamp from The Stamping Chef; Dylusions sentiment; Tim Holtz stencil; Dreamweaver embossing paste; Peacock Feathers distress ink; Spectrum Noir markers; Spellbinders butterfly die
If there's something I didn't list that you're curious about, just shoot me a comment :)


This sentiment is pretty perfect for most of the Stamping Chef images ;) To tint the embossing paste, something I am forever mucking up, I scooped a small amount of the paste into a piece of plastic packaging (free mixing dishes! Save those little things!) and added 2 drops of "hot pink" Ranger ink. You can see that it thinned the paste enough to allow some bleeding through the stencil - but I like the overall effect. Next time I try one drop. 


After colouring this pretty girl, I gave her some sparkly strands of hair & of course, sparkly eyeshadow. The piece of tulle was folded into a triangle (and then folded again) and tucked in behind the doily.

To attach the beads to the binding, I use jewelry wire, wrapping it around the coils as I go. Since I've done it a number of times I have a feel for how much the binding can support without making the book impossible to open. Last touch was tying a ribbon at the top coil to use as a bookmark.

Naughty or Nice Challenge - Anything Goes
The Stamping Chef Challenge - Anything Goes

Be right back!
xoxo,
Jessi

Tuesday, August 19, 2014

Seize the Sketch #27 - Cathy's Sketch


Thank you!

This is a bittersweet post - this is the last challenge for us at Seize the Sketch. I've had a great time playing with these talented women, and I know I'll still be stalking all their blogs. Since it's our last hurrah, help us go out with a bang & lots of players! Cathy designed the sketch this go-round:


Supplies: floral block stamp from Stampabilities; thanks from Stampin' Up; Mowed Lawn distress ink; Versamark & clear EP; green rhinestone

My card is super simple - the two 'boxes' made me think of this floral stamp, which I masked off to stamp just 2 motifs.

Here's the sketch: 


Check out what the rest of the amazing DT did!

xoxo,
Jessi

Shopping our Stash #165 - Chipping Away!


This week at Shopping our Stash we want to see you use chipboard - if you don't have any in your stash, you can always die-cut your own out of cardboard (cereal boxes work particularly well!). For some reason, although I have plenty of chipboard, it's not something I reach for much. The piece I used on my card...I've had the package for at least 2 years, and I pull it out now & then, stare at it, and put it away. Then I realized that one of the banner pieces would work well for a Grumpy Cat Hat if I trimmed it down a little:


Supplies: Cat & sentiment from Zap Pow!; Spectrum Noir markers; paper & stickers from DCWV; chipboard banner & star from Fancy Pants; home made enamel dots

Ready to chip away at your stash? (snort) Check out the design team creations & join us before next Monday, August 25th!

Barb (off this week)

And after a hiatus, we're excited to welcome Chana back! 

xoxo,
Jessi

Tuesday Morning Sketches #263 - Sami Stamps!

I'm not going to lie to you - it took several attempts to come up with my card for today's Tuesday Morning Sketches!  As some of the best ideas do, it came to me once I stopped trying so hard. Last week I worked mainly on baby cards, and *poof* my idea showed up. Love that :)

Sami Stamps is our sponsor this week - if you haven't checked out her images, you should! Sweet & whimsical.

And, sadly, Angela has stepped down from the TMS team - she's been there since I joined the team, and I know I'll still be seeing her awesome work over at Just Monkeying Around!


Supplies: papers from Echo Park; dress stamp from Unity; sentiment from Studio G; Spun Sugar & Victorian Velvet distress inks; heart button from Dress it Up


It was hard to get a crisp picture of the light pink stamping. I inked the stamps first with Victorian Velvet & then Spun Sugar to get a mid-tone pink. 

Here's the sketch, designed by Debbie:


This sketch is open until next Sunday, August 24th  hop on over & see what the design team has created for you!


Bonnie (off for August)
Kris 

xoxo,
Jessi

Monday, August 18, 2014

Arigato!

So I wanted to post today to remind you all to pop on over to see my sistah's blogs for the Unique Blog Hop...and then I took a muscle relaxant for my back this morning, and slept and slept instead. It's a little later than I meant to do it, but conveniently this Internet thing keeps stuff until you're ready to look at it :)


I thought the perfect card today would be not only one that says THANKS for all the awesomeness that knowing these gals has brought to my life - but even uses some cool stuff that Donna gave me :)


Supplies: Lawn Fawn Let's Roll stamps & dies (from Donna!); Spectrum Noir markers; Mod Podge Dimensional Magic; Labels 5 Nesties; Carnelian EP & versamark; Memento Tuxedo Black ink


Photography skillz failed me here - but I glossied up the heart & the soy sauce bottle. I was going for an enameled chopstick look, but next time? I'm going to do the inking & embossing before die-cutting. Hanging onto those itty-bitty sticks while trying to heat emboss? Not so much.

I used the matching dies to cut out the wasabi, sushi, soy sauce, and chopsticks, and  then arranged them all onto the platter. So much fun - and can I say, these are the first matching dies that I've used that seem to cooperate with my unable-to-line-stuff-up ability? YEAH!

I kept the "C" colour scheme from Make the Day Special in mind while colouring - they have a choice of 3 different colour schemes this month. Something for everyone there :) And the Let's Roll set is available in their store. (StampsDies)


Now to stay awake long enough to feed the kids supper! The good news is, my back is MUCH better (although not 100% yet). Luckily I have strong boys who will carry all the laundry baskets for me!

xoxo,
Jessi

Sunday, August 17, 2014

Merry Monday Pinecones

Well, I did something to my back. It happens now & then, and boy, does it make everything difficult! Muscle relaxants aren't great for thinking :) I did get a card made for the barely-current Merry Monday challenge - finding pinecones wasn't easy! Patterned paper came to the rescue.


Supplies: Mainly stash - Recollections tag; PTI sentiment; Brushed Corduroy distress ink; Paper Smooches twine; Corner Chomper

I'm also really excited because after years of a gimpy desk chair, Rob surprised me with a new chair yesterday. The back is not only securely attached, but adjustable. So when I can sit at the desk again, I'll have back support! *wooooot*


xoxo,
Jessi


Tuesday, August 12, 2014

Shopping our Stash #164 - Back in the Day


This week at Shopping our Stash we'd like to see you go wayyy back & dig out those tools/techniques that you first used when you started creating - old-school eyelet setting with a hammer, texture plates (not embossing folders), template & knife cutting instead of dies, that sort of thing. If you've already moved on & don't have any of that old stuff around any more, you can also use an old-timey image. (Not just a vintage/shabby chic style, but an actual vintage THING like an old phone, gramophone, antique car, that sort of thing). 

I've still got my trusty eyelet setter & mallet in my desk drawer (no idea how old the mallet is - it was in this house when we moved in. Score!) so I dug out some of my remaining eyelets:


Supplies: Stamps from Paper Smooches; Memento Tuxedo Black ink; Spectrum Noir markers; eyelets; twine from a store that went out of business 5-6 years ago. 

I also added a twine wrap using ancient twine from my stash - and with the amount of 'hair' it shedded while trying to wrap it, I remember why I haven't used it all yet ;)

Ready to time-travel with us? Check out the design team creations & join us before next Monday, August 18th!


xoxo,
Jessi

Tuesday Morning Sketches #262 - Craft Classes Online!

This week at Tuesday Morning Sketches we are sponsored by Craft Classes Online (formerly known as My Creative Classroom). You could win a seat in a workshop class by playing along with us this week!

It's also TWIST WEEK - you don't need to use the twist to play along, but you do need to use it in order to win :) This time around the twist is WATERCOLOUR. I've created a watercolour background for my card:


Supplies: Sentiment from Paper Smooches; Peeled Paint distress ink; Tiger Lily, Yellow Daisy, & Olive glimmer mists from Tattered Angels; trim from Webster's pages; buttons, leaf, & flowers from stash


The green background was created by smushing the Peeled Paint ink pad on an acrylic block and then spritzing with the yellow & green mists. The orange background was created by painting the mist directly onto the paper. I used my Tim Holtz ruler to pierce along the top of the orange piece to stitch it into place. 

Here's the sketch:


This sketch is open until next Sunday, August 17th  hop on over & see what the design team has created for you!


Bonnie (off for August)
Jenee (off this week)
Kris 

xoxo,
Jessi

Monday, August 11, 2014

A Unique Blog Hop!

I was asked a few weeks ago by Andrea of Savvy Handmade Cards to take part in this cool progressive blog hop. I really enjoy learning more about my fellow crafty buddies, and so it was a no-brainer to accept the challenge :)

I first met Andrea through playing along at Tuesday Morning Sketches - I was sponsoring one week with my crocheted mats & she was the lucky winner! Of course I had to follow her blog to see what she made with them. That was close to two years ago (I think) and since then she's begun hosting her own challenge  on her blog, as well as creating some amazing heartfelt cards. I love seeing what she gets up to in her crafty time!

So the idea behind this blog hop is to answer a few crafty questions - and to put your own spin on it - so here we go!

1. How did you get started?
I've been crafting with one medium or another since I can remember. In high school I used to decorate HUGE cards for my friends' birthdays - I did cross-stitch - I painted a zillion clay pots - I putzed around with salt dough. In 2003 I branched out into card making. I got brave & booked a table at a craft fair, and it's taken off from there. Since then, I've been a regular vendor at the Sackville Farmers Market.
In 2010 I started this blog - holy moly almost 4 years! - and entering challenges. That has definitely pushed my creativity in new directions, and helped me learn to take better photos. Crafts for me have served as a creative outlet AND as a break. When I was getting started, my boys were just beginning the process of being diagnosed with autism (Connor was diagnosed in March 2003 and Riley in December 2003). We'd just moved to a small town in Nova Scotia where I knew no one, and I was home all day with two very active & non-verbal kids. Finding friends through my kids hadn't worked in the past - in fact, we had been asked to not attend a church playgroup because Connor was disruptive. Without a diagnosis to explain his behaviour, I accepted that and honestly, I wasn't strong enough to continue pushing out into the community and risking that kind of judgement. Going to the farmers market gave me social time & a much-needed break, and it still does.

2. What are you working on?
I'm lucky enough to be on 4 challenge teams - so I keep a list at my desk of the upcoming challenges for the month. When I sit down to create, I have those themes in the back of my mind in case I come up with an idea I want to use. I also have a number of favourite challenges to play along with, so I jot down those as well, and bring my 'challenge sheet' back & forth between my crafty desk & the computer desk. It's rare for me to sit down & say "OK, I'm making a card for X challenge!" Generally I just start to play & see where it takes me.
I recently went to a Jamberry nail wrap party, and one of the wraps inspired this creation -


Supplies: Mr. Huey's White mist; Dylusions purple mist; Flourishes flower stamp; Paper Smooches sentiment; Memento Gray Flannel ink; Adirondack Purple Twilight ink; clear EP; vellum & button from stash

I'm not so sure the shadow stamping works on this one, but I have more of the painted background to play with. I mixed the two mists to paint with - although one is pigment & one is dye-based, it seemed to work. I also gave it a spritz of hair spray once it dried - after 3 days the white pigment was still coming off on my fingers. 

Being inspired by my nails is definitely a first!

3. How is your work different from others'?
This is always a tricky question, like trying to define your own style. I think one unique aspect of my work is that I am comfortable creating in lots of different styles - CAS, layered, shabby chic - and that I can't easily identify what my own *look* is.


4. What do you create?
Primarily cards - but also journals, crochet, frames, whatever happens to strike my fancy. I generally make about 20 cards per week, but my personal record (at Christmastime) was 76 cards. Creating with a deadline spurs my creativity! I don't photograph everything that I make. Besides sharing stuff here on my blog, I also have a crafty Facebook page, and I try to share different creations there. 


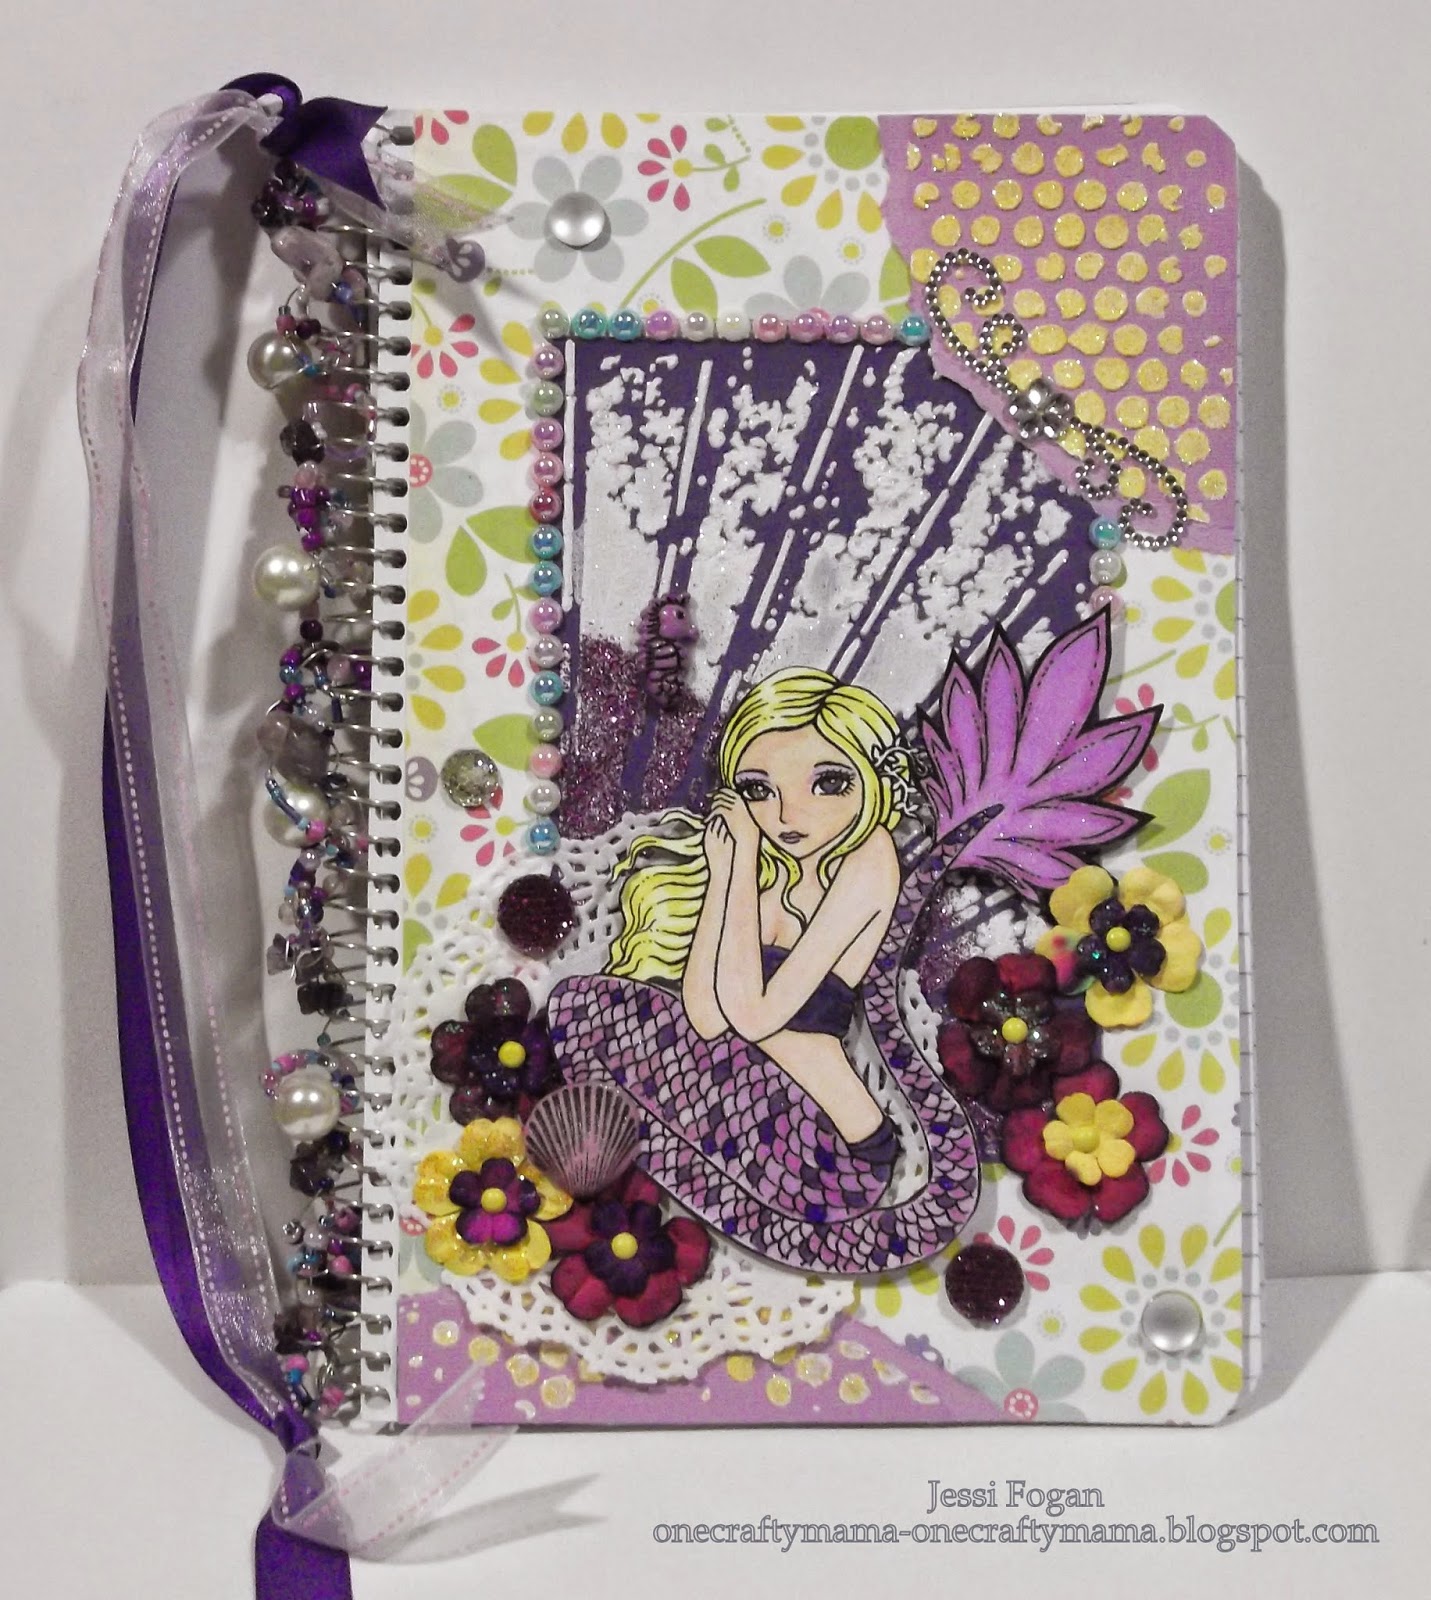
One of my recent journal creations

 Supplies: Sweet Pea stamps digital mermaid; Tim Holtz & Memory Box stencils; Dreamweaver embossing paste; hand-dyed Prima flowers; Spectrum Noir markers; all sorts of random goodies!


5. What does your crafty space look like?
Well, it's not pretty. Most 'studio tours' I see on blogs belong to people with lots of space and (it seems like) lots of money. I'm a stay at home mom in a small house crowded with people & pets. Even if I did have lots of space & money, I'd still be a slob when it comes to crafting! I debated whether or not to share the *real* crafty space, and then I thought hey - someone's sure to see this & feel good that they aren't the only ones without the big room & fancy storage!


The brutal full picture. The shelf to the left is the newest addition. Random stuff up there for the most part, but one of the copy paper boxes is full of out-of-season cards. Stereo with CDs, because I always listen to music while I create. Family photos, cards from pals - and my grandmother's birthday present, still waiting to be mailed. D'oh. Don't forget the uuuuuugly paneling!


The storage tour! Beginning on the left:
Top: quilling papers, odd card stock
Top drawer unit: 12x12 papers, specialty papers (vellum, etc)
Bottom drawer unit: safe drying space - where I keep quilled pieces until they're dry, clay embellies, etc.
(To the left of that, barely in the picture - a cardboard box with Thickers, stickers, that sort of thing)

Next tower - with the CDs on top
Top: 6x6 plain cardstock, in a container. The sheet of 12x12 on top keeps the dust out.
CDs (right now listening to a lot of Lorde & Passenger)
Circle punches
Top drawer unit: my plain white card stock
pre-cut/scored/stamped card bases (I have a stamp for the back of my cards)
Embossing powders & sponges for the Distress tool

Bottom drawer unit: mists & inks
embellishments (that drawer is a black hole)
Buttons

And, skipping to the right - the tall tower, with boxes on top, holds all my Christmas crafty stuff. The pizza box is baby-themed stuff. There are more pizza boxes under the desk with all manner of stuff stuffed into them. I also keep a box of ribbon down there. 


I think this photo is probably pretty self-explanatory. Chaos. The plastic containers are for recycling & garbage, and I have a baggie there for 'compost' items (tissues, baby wipes). Cleaned stamps sit here waiting to be put away. The stack of paper pads are the ones I'm currently using a lot. The others live in a cloth grocery bag. 


The work surface. A stack of looseleaf & printer paper to use as scratch paper. My most-used tools are in that tray with the M. This is also the spot where I take photos - I have two sheets of 12x12 card stock that I place over the scratch pad. The card in progress will be a keepsake card if I ever decide where I'm going to glue those flowers.


The tower on the desk (at the very back here) is full of paperwork related to the kids, and flotsam & jetsam from around the house. It's what everyone regards as  the "safe place" to leave watches, etc. The pile of stamps, flowers, paper, etc. is all the things I've pulled out thinking OOH I should make something with that! Those items may be there a long time. There are two baskets - one with my most-used sentiment sets, and one with my dies. I have zero organization for dies other than that they go in the basket. There's a goldfish crackers box with sequins, stickers, chipboard, that sort of thing. In the desk drawer I keep my embossing folders & additional plates for the Cuttlebug, which is on the floor under the desk. 

For a rare moment in time, Abby is cuddled up in her crate - usually she sits at my feet when I'm at the desk, but I kept moving around. 

There you go - if only I could provide the soundtrack of the house to go with the photos, lol!

So, now that you made it this far, I get to tell you who I'm tagging to take part! I've chosen three of my Snarky Sisters:

We harbour deep suspicions that we were separated at birth, Chris and I. We are the Evil DoubleMint Twins, or EDMT for short. 

I've had the absolute pleasure of getting to meet Donna twice on her trips to the East Coast - including going to the zoo together this summer with our three boys! 

She is hi-freaking-larious - and being posted in Europe, is online at a decent time of day there while I'm up waaaayyyyy too early in the morning. I love our early-morning chats!

All three of these fabulous ladies came into my life via the Drunken Stampers - and they, with the rest of the Snarky Sisterhood, are an honest-to-goodness lifeline. Kids driving you nuts? Instant commiseration. Difficult or annoying family issue? Totally there for you. Just having a crap day? You get the idea. Go see them. You'll giggle, I promise. And then go see them again when they share their crafty stuff next Monday, August 18!!

*MWAH*
xoxo,
Jessi